Install the STACKIT Server Agent with STACKIT IaaS API, STACKIT CLI or STACKIT Terraform
Last updated on
To take advantage of our latest features such as ‘Run Command’, ‘Server Update Management Service’ and many more, the STACKIT Server Agent must be installed on your server as a basis. The STACKIT Server Agent serves as an interface between our infrastructure and the operating system and receives and processes scripts sent remotely and runs them locally on your server, enabling you to customize your server settings as needed.
The following documentation describes how to deploy your server fully configured with the latest STACKIT Server Agent version available using the STACKIT IaaS API, STACKIT CLI, or STACKIT Terraform.
If you prefer to install the STACKIT Server Agent with the STACKIT Portal, refer to this documentation: Install the STACKIT Server Agent with Portal.
If you want to install the STACKIT Server Agent on an already running Linux or Windows server, refer to this documentation: Install the STACKIT Server Agent on an existing Server.
Prerequisites
Section titled “Prerequisites”- You have created a Service Account.
(See: Create, manage and delete service accounts) - You have assigned the required project permissions to this service account.
(See: Assign roles to a user or service account) - You have created an Access Token for this service account.
(See: Acquire short lived access tokens) - Basic knowledge of how to use APIs: How to create a VM with the API
- Knowledge of how to use the STACKIT CLI or STACKIT Terraform.
- How to create a Windows Server with APIs & CLIs: Create a Windows Server with the STACKIT API
Installing the STACKIT Server Agent on a server with the IaaS API
Section titled “Installing the STACKIT Server Agent on a server with the IaaS API”The STACKIT Server Agent is installed with vendordata if the corresponding flag is included in the API request. When deploying a server through the STACKIT IaaS API, ensure this flag is set if you want the agent to get installed. You can set this flag as agent property in the API (for more information see API Docs).
1. Standard request
Section titled “1. Standard request”When using public STACKIT images, simply include the provisioned flag:
JSON{ "agent": { "provisioned": true }}2. Using custom images
Section titled “2. Using custom images”For custom Linux images, the STACKIT infrastructure must be notified that the image is agent-compatible before you create the server. This is typically done during your image release pipeline.
After uploading your image, you must send a PATCH request to the IaaS API Image endpoint to set the agent properties:
Endpoint: PATCH /projects/{projectId}/regions/{region}/images/{imageId}
Example Payload:
JSON{  "name": "my-server",  "machineType": "g2i.1",  "imageSourceId": "<IMAGE_ID>",  "agent": {    "supported": true,    "provisionByDefault": true  }}
supported: Must be true for the agent to be installable with vendordata.
provisionByDefault: If set to true, the agent installs on every server created from this image, even if the agent flag is omitted in the server creation request.
Note: Without these metadata properties, the vendordata injection does not trigger, and the agent is not installed automatically.
3. Fallback with user data
Section titled “3. Fallback with user data”If your OS does not support vendordata (for example Windows Server, Debian 11), you must manually inject the installation script with the Userdata field.
Important: When using Userdata for installation, the agent.provisioned API flag should typically be omitted or set to false to avoid conflicting installation attempts.
For the specific scripts to use in Userdata, refer to: Install the STACKIT Server Agent on an existing Server.
This method of providing the STACKIT Server Agent is supported for all latest x86/amd64 versions of STACKIT public Linux images (ARM support is planned).
Installing the STACKIT Server Agent on a server with STACKIT CLI
Section titled “Installing the STACKIT Server Agent on a server with STACKIT CLI”The STACKIT CLI uses a provisioning policy to determine if the agent should be installed during server creation.
stackit server create \ --name "my-server" \ --machine-type "g3i.2" \ --boot-volume-source-id <IMAGE_ID> \ --agent-provisioning-policy "ALWAYS"The —agent-provisioning-policy flag supports the following values:
| Policy | Description |
|---|---|
| ALWAYS | Force the installation of the agent, regardless of the server image configuration. |
| NEVER | Do not install the agent, regardless of the image configuration. |
| INHERIT (Default) | Use the default behavior defined in the chosen server image. |
For more information on how to install and use the STACKIT CLI, see the official GitHub repository: stackit-CLI.
Installing the STACKIT Server Agent on a server with STACKIT Terraform
Section titled “Installing the STACKIT Server Agent on a server with STACKIT Terraform”In the STACKIT Terraform Provider, the agent installation is managed with the provisioning_policy argument.
resource "stackit_server" "example" {  name                = "my-server"  project_id          = "<PROJECT_ID>"  machine_type        = "g3i.2"
  boot_volume = {    source_id   = "<IMAGE_ID>"    source_type = "image"    size        = 64  }
  # Defines the agent installation behavior  agent = {    provisioning_policy = "ALWAYS"  }}
The provisioning_policy argument supports the following values:
| Policy | Description |
|---|---|
| ALWAYS | Force the installation of the agent, regardless of the server image configuration. |
| NEVER | Do not install the agent, regardless of the image configuration. |
| INHERIT (Default) | Use the default behavior defined in the chosen server image. |
The attribute agent_provisioned is available as a read-only field to check the status, but the provisioning_policy is the primary control for your infrastructure code. (See: STACKIT Terraform Provider Documentation: https://registry.terraform.io/providers/stackitcloud/stackit/latest/docs)
Verifying the STACKIT Server Agent installation
Section titled “Verifying the STACKIT Server Agent installation”After initiating the server deployment, check the status of your server. Once the server is available and you are able to log in, verify that the STACKIT Server Agent is installed by checking the status of the STACKIT Server Agent service STACKITServerAgent.
In Windows use the following PowerShell command:
Get-Service STACKITServerAgentAlternatively check the status in the Service tab of the task manager:

In Linux use the following command:
systemctl status stackit-server-agent.service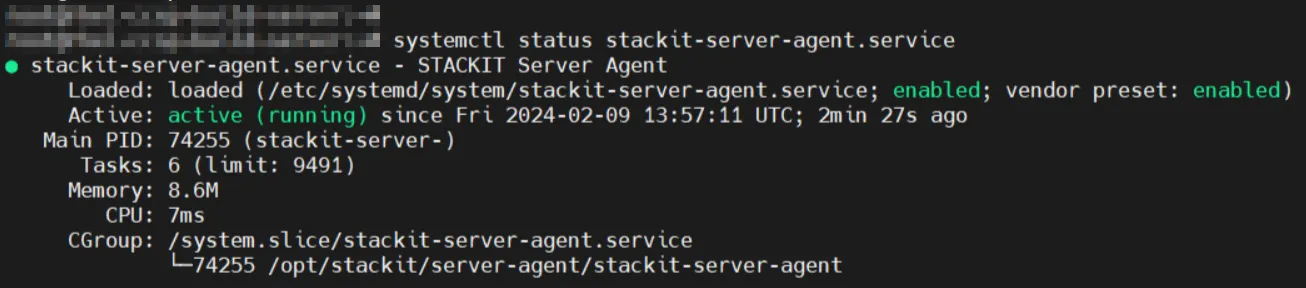
The STACKIT Server Agent is now fully configured and can be used to run commands.